Friday, December 12, 2014

Give Meaning to Numbers with Technology

A colleague and I were talking about math problems a few days ago.  He told me that he really likes to give meaning to numbers because it helps the students put the numbers in context.  I completely agree. We were working on percents at the time in my Introduction to Algebra class so I decided to give a little more meaning to my percentages.  Here is what I did.


Since my students have laptops,  I had them go to Kohls.com and pick out an item that they liked. They got to choose a 15% off, 20% off, or 30% off coupon.  (I thought they all would pick the 30% coupon too, but they didn't)  Take the price of that item and reduce it by the coupon amount.  Then they were asked to add on 8% tax.  Lastly they had to post their work to a padlet.com site where all could see their work.  You can see their work too: http://padlet.com/dsladkey/kohls  Padlet is a great tool for student collaboration.  www.padlet.com   


Here is the progression of the assignment
1.  Find an item at Khols.com  Find the price.  (even if it is already discounted)
2.  Choose a 15% or 20% or 30% off coupon.
3.  Reduce the price by the amount on the coupon.
4.  Take the new price and add 8% tax to it.  
5.  Show your picture and all your work on a common padlet site for all to see.  http://padlet.com/dsladkey/kohls


What were the big takeaways?
1.  They learned the material without a bunch of problems without meaning.
2.  Choice.  It gave students a choice for what they wanted to work on.
3.  Pride.  When we shared these out, there was a lot of pride happening.
4.  Recall.  A student asked a question on the test and I just said "Do you remember what you did with the Kohl's activity" and they said, "Oh yeah"
5.  Engagement.  This activity took about one 50 minute period. They were diligently working the whole time.
6.  Accountability.  All students could see all the posts.

Dave
@dsladkey

Friday, November 7, 2014

Shadowing a Student for a Day

I was a student in high school again today.  Wow, what an experience.  Shadowing a student  has helped me to know better how to teach my current students.  I can know a little bit better what is going on in their world.  Here was the schedule for the day:  Algebra 2, Chemistry, Digital Art, US History, PE ( swing dancing), Lunch, Study Hall, and English.  


Here are some things that I got out of the day.

1.  I'm exhausted.
This was mentally and physically taxing today.  I was wiped out by 7th period.  I had one more period to go.  Our students really put in a lot of energy into the school day.  And most have some type of extra curricular activity after school.
How I might modify my teaching:  Empathize and adjust the outside of class workload.

2.  I sat in a chair a lot today.  I being a math teacher calculated how much time in minutes I was in my chair.  303 minutes in my chair.  Almost all of the chairs were swivel chairs which helped.  However, that is a lot of time just sitting.
How I might modify my teaching:  Create more activities that encourage movement.  Give more choices for students to be able to move around during class.

3.  Our students are learning a lot in one day.  I took notes in every class.  My notes turned out to be 7 pages long.  It was a ton of information.  It was engaging material.  I really loved learning these new things. I also wanted to create something instead of just learning about something.  
How I might modify my teaching:  Be efficient.  Be concise.  Don't  give busy work.  Have a purpose with everything I give my students. Have students CREATE more.

4. We have excellent students and staff at our school.  I really wish I could be back in school.  The teachers were engaging and passionate about what they do.  The students were respectful and were very cooperative.
How I might modify my teaching:  Tell my students how much I appreciate them.  Enjoy the moment and the journey.  I have a wonderful job.  Show how much I enjoy teaching.

5.  I got to know the teacher very well in one class period.  What it made me ponder was "do my students know if I know them?"
How I might modify my teaching:  I need to know my students.  I need to show them individual time.  Students deserve individual attention.


Kyle, You were the perfect host.  I can't thank you enough for letting me into your world.  It was eye opening.  I appreciate what you go through a lot better now that I was in your shoes for a day.  Thank you!


Random Thoughts

  • We did a Brain Break in the middle of one of the lessons.  That was FUN!
  • I'm pretty sure I was the only one in the cafeteria who had a hard boiled egg in their lunch.
  • Jessica helped me out in PE swing dancing.  Thank you for being very patient with my 2 left feet.  I really was nervous
    about this part of the day. 
  • MY EYES ARE BAD.  I realized right away that I couldn't see the board as clearly as I thought I could.  (must have something to do with being 50! haha)
  • THANK YOU for inventing Swivel Chairs.  
  • The lunch table talk was blunt but enlightening.  
  • I almost made Kyle late because I had to use the bathroom between classes.  It made me a lot more sensitive to allowing students to go to the bathroom during class. 
  • My mind wondered a lot.  There is a lot of dead time in the day to be able to do this.  I tried to stay focused but was a little tired.  
  • I really liked math class.  I guess it is a good thing I'm a math teacher.  
  • I never had an interest in the Great Gatsby until the class today.  Now I'm very intrigued. 
  • Hacky sack is a tough game.  To get someone else out you need to juggle at least 4 times.  I only did 2.  I was out pretty quick.  
  • I'm really humbled to be a teacher.  It is quite a responsibility.  I don't want to ever take for granted the charge I have.  
  • I took 7 pages of notes today.  An organization system is a must for students.  


Here is my journey on Twitter Storyify Journey 


Now, I challenge you to Shadow a Student for a Day!  Ask your principal today and DO IT.  You will be pushed out of your comfort zone, but you will never regret it.  Let me know how your journey goes.
My Very Best,
Dave


Friday, October 24, 2014

Hashtag Closure

This was really fun.  My students loved it.  And it was different.  It brought out relevance and personality to the class.  It also gave a voice to some of my students.  Give it a try.  Thanks to my colleague Mary Martin (Via Steve Stack)  who gave me this idea.  

Ask your students to make a hashtag summary for the topic of the day (or week, or unit, or ?)  I used it as I closed the day out. Then ask them to share them out with the rest of the class.  You can share out results on the board.  Then have students vote on them.  Students loved it.  For those of you who do not know what a hashtag is…A hashtag is a word or an unspaced phrase prefixed with the hash character, # , to form a label.  Hashtags are used in social media as a type of tag to group information.  #postseason #edchat

I did this with my precalculus student's and they put a few things that were terrific and some things that were just plain funny.  We were studying rational functions and vertical asymptotes.
#ZeroDenom  #FindTheZerosInTheDenominator Some funny ones were #AskMrSladkey #Desmos.  I was talking about something the next day in class and said "remember the hashtag closure" from yesterday.  It was a great brain trigger.


Mary taught me to use Socrative.com to share out results.  It is so easy.  I had never used it before last week.
  •          Log into socrative.com  and then teacher sign in. Go to Sign up.  Then go to profiles and change your room name to your last name.
  •         Go to quick question.  Then click Short Answer question.  Type in your question.  Require students names.  Click Start
  •         Have your students go to socrative.com and go to the student sign in.  ( I had my students use their phones)  Have them use your room name.  They don’t need to sign up.
  •         When they answer the question it will show up on your screen for all to see.  After all have entered their answer, then vote on the result.

I hope you can give it a try today.

Dave

Sunday, October 5, 2014

Shifting to the use of Desmos and Geogebra Online Graphing Calculators


Wow.  This is fun.  I can't believe how easy it is to put math into our student's hands.  It is fast too. With a simple url link I have given my students many activities in seconds that takes them DIRECTLY to the concept.  This year I have really shifted my thinking away from the hand-held graphing calculator to the online calculators Desmos and Geogebra.  I use both for different purposes.  This post is a little about my journey this year.

For my day to day work, I have my students take out their smart-phones, or their iPads, or their school administered tablets and use Desmos free online graphing calculator.  For class activities, I often use Geogebratube.  This is easy way to challenge students with a math "scenario" online.


DESMOS EXAMPLE
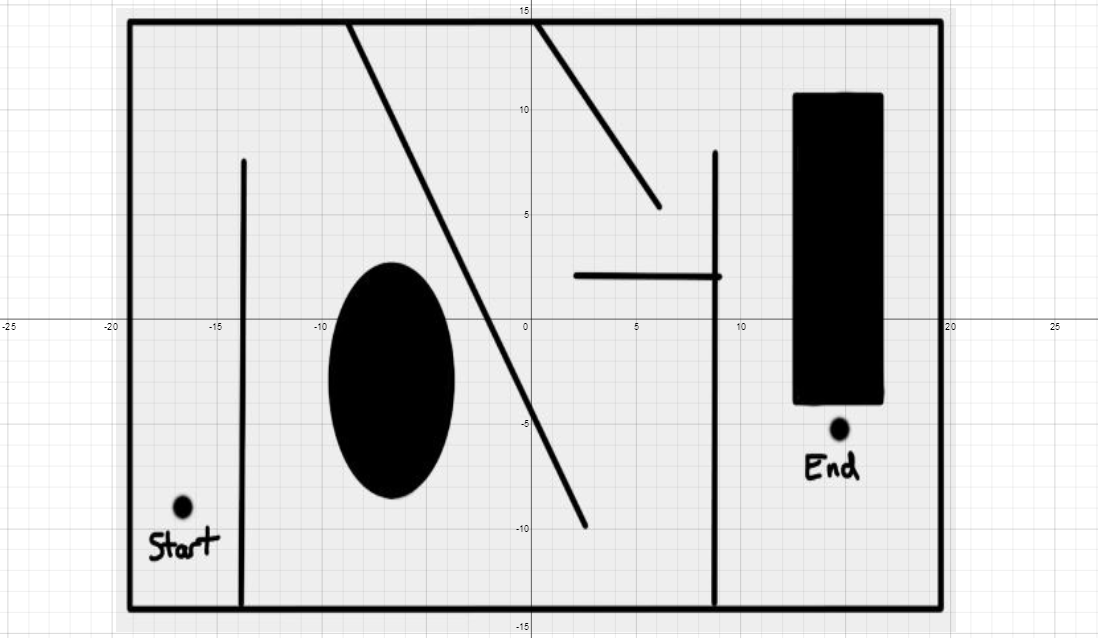
This week we were reviewing quadratics and I gave this "challenge" to my classes.  They had to navigate a MAZE with lines and parabolas.  Here is the actual activity that I gave them. http://tinyurl.com/sladkey218    Notice it is an easy to use to type in link.  (This is called a url alias and I use the free website called http://tinyurl.com to set this up)   I  also made a short video for help clues too.  Not everyone needed it.  http://tinyurl.com/sladkey219 
Here are a couple of comments my students have made about Desmos.  One was how he liked Desmos because the he could see both the graph and the equation at the same time.  He didn't have to go back and forth from the equation to the image.  Another student said they like the fact that they could find the graph so easily.  You can just use your fingers to pinch the screen and you can locate the graph.  Whereas while using a handheld graphing calculator you have to go back and forth from window to graph, to finally get the right graph screen.
This is how one student solved it.  There is so much math here.  The students really talk the talk too.


One video that really inspired my use of Desmos was by @bobloch on twitter he shared this demonstration on inequalities.  Check this out.  

GEOGEBRA EXAMPLE
I have always had a hard time explaining increasing and decreasing.  This turtle Geogebra activity really helped my students visualize what increasing and decreasing is and how it is represented.  http://geogebratube.com/student/m149285

You can see that there is a ton of material that can be used with Desmos and Geogebra.  Go and explore.  Let me know how it goes.  My twitter name is @dsladkey.  I'd love to hear from you.

Best,
Dave

Wednesday, June 11, 2014

5 Random Technology PD (Professional Development) Thoughts


Technology is tricky. Everyone is at a different place. So PD (Professional Development) time is very important. Here are a few random thoughts that have been rolling around my head since our latest Technology PD day.


1.  Whole group "how to" technology training rarely works. Most of the time 1/3 of the people are bored, 1/3 are with you and 1/3 are completely lost and frustrated. Group "how to" technology training certainly has it's place at times but should be avoided if possible.  

2.  Let the computer teach the "how to" technology through tutorials and a self guiding pace.  Offer 1 to 1 help for the very few who can't do self guided. 

3.  Design PD activities that model good teaching practice (above the SAMR bar or higher in Blooms taxonomy) and forces the use of the technology within the activity. This way you can show a good teaching idea and you can help them learn a new technology. 

4.  More than a half day of whole group technology PD is too much.   If you want a whole day of PD then maybe half the day is spent in a whole group atmosphere and half is spent in very small groups  or with a partner or alone.   

5.  I think some self reflection time must be built in to our PD.  i.e.  15 minutes of journal time reflecting on the things you have learned and the questions you still have out there.   We put a lot of emphasis on closure in the classroom, and rightly so. Self reflection is a type of individual closure that will help us process what we've just learned and help us remember it. 

I welcome your random thoughts or comments. 


Thursday, June 5, 2014

10 Reasons Why I think the TI-84 is on the way OUT!


Yesterday a colleague told me she overheard some students talking about how they never used their TI-84 at home.  She pursued the discussion and they said that they use DESMOS the online calculator all the time at home.   I think the use of it will go away slowly.  But it will happen.

The TI-84 (or TI-83) has been a fixture in my classes for many many years.  It has been a requirement on my syllabus.  It is something that I would daily ask my students to take out and work with.  I can't count the number of tutorials I've made to help use the TI-84.  It has been a go-to device for CONCEPTUAL learning.  But things are changing.

My Prediction.  Our school will not be requiring the TI-84 in the school year 2015-2016.  I have no authority to make that call.  I'm just making a prediction.  Our school goes 1 to 1 that year.  In my opinion, the days of every student having a TI-84 are going away.  Why?  Because other things are passing it up. And the thing that is passing it up is NOT another Graphing Calculator.  It is the Internet with web based interactions and  apps.

-

10 Reasons why I think the  TI-84 will NOT be required at our school in 15-16 
1.  Touch Screen
Students are getting frustrated with the TI-84 because it doesn't offer a touch screen.  The touch screen on a SMART-Phone or a tablet helps with finding the right window, editing data, sliders, and a bunch of other cool things. Also, the mouse is even better than the awkward navigation system of the TI-84.   I have tried to physically touch the TI-84 screen many times.  That's embarrassing.

2.   Ease of Use
As technology gets easier and easier to use.  The TI-84 seems to be more and more confusing to use.

3.  Size of Screen
A computer screen is a lot bigger than a TI-84 screen.  And a SMART-Phone screen is equivalent to a TI-84 screen.

4.  THE COST!
Why should we ask our students to pay $100 if our students will have constant access to a district owned device?  (i.e. tablet, Surface or Chrome book)  EVERYTHING that a TI-84 can do, a district owned device can do.

5.  1 to 1
Our district will likely go 1 to 1 in the 2015-16 school year. Every student will have a district owned device like a tablet at that time.  It doesn't make sense to have both devices.

6.  Data Exchange
The TI-84 system of exchanging data is old and outdated.  Basically it is useless.  For me to get something onto my student's calculator is nightmarish.  (It used to be really cool)  But, because the transfer of data is so easy with phones, and computers, and  tablets, that the technology of the TI-84 is really getting in the way of collaboration.  Remember, it used to be so cool to give your students a program or some data via the cord that goes between the calculators.  There is way too much teaching time wasted on account of this.  The students know a lot of ways to get information to each other that does not require a cord.

7.  Finding the Right Window
I have forever said that finding the right window is a great math skill on the TI-84.  However, I think I have been bypassed with the love of this skill.  The ease of a computer or tablet to get the right screen is far superior to the TI-84.

8.  Animations/Sliders
Sliders offer a hands on approach to math.  It encourages participation with the activity, with low risk high reward outcomes.

9.  Apps and Programs
The Internet math based apps are gaining momentum.  It's getting easier and easier to use math notation on the Internet.

10. Internet Based Math 
Desmos, Geogebra, LaTeX, online calculators etc.  This is just the beginning.  

Standardized Tests are the problem. I don't know what will happen with these.  The TI-84 has been a fixture for an acceptable device on the standardized tests for a long time.  With the PARCC online testing, this might be changing too.

TI-84 may you Rest In Peace.  It is time to move on.

Wednesday, May 28, 2014

Graphing Polar Equations with Desmos (online graphing calculator) and Padlet (online bulletin board)

This was easy.
We had just covered polar equations in precalculus. I then told each student they should make a cool design using 10 or less equations. Wow. They really loved it. They explored well beyond what we covered in class.

1. Log into desmos.com and either sign in or sign up.
2. Make a desmos polar graph using 10 or less equations.  Use r= equations and use theta as your variable. Also you can use a polar background if you like. www.desmos.com
3.  They should save their graph in desmos. (you can only do this if you are logged in)  Then click on share which gives you a link. Save that link.
3.  Then they had to log into the padlet.com site URL that I gave them. Here it is: http://padlet.com/dsladkey/6kdefazyz9wp  They double click anywhere on the screen to make a post. I had them put their name and then put the desmos link right in the post. www.padlet.com   I have put a picture of the padlet site.

Give it a try and let me know how it goes.
Dave


Tuesday, March 11, 2014

What is the Weight of the Snow You Shoveled this Winter?

A colleague of mine gave me an article today from the Chicago Tribune called "One man's snow-shoveling total: 25 tons (and counting)"   Take some time and read it.  I loved it.  There is a TON of math in this.  Pun intended.  Wallberg (the author) challenged us to find the amount of snow that we have shoveled on our own driveway.  So, being the math geek that I am, I did it.  Here is my work.

1.  I found the area that I shovel on my driveway. Use this site:  Free Map Tools This site is really cool.


2.  Let's change snow to water. Wallberg (the author of the article) uses a 15 inches of snow to 1 inch of water ratio.  So we have had 75.2 inches of snow this year so far divided by 15 will give us the amount of water in inches that we have had this winter.  That is 5.01 inches of "rain" that fell as snow.  That is (5.01/12) of a foot.
from www.montecitowater.com/ 
3.  Ok now lets figure out how many cubic feet of water that is.  I took the area that I found for my driveway from the cool website above and multiplied that by (5.01/12).  That is 1085 square feet times (5/12) foot to equal the number of cubic feet of water that is on my driveway.  Remember that the (5/12) foot will be changing as there is more snow predicted tonight.  That would be roughly 453 cubic feet of water.

4.  One cubic foot of water weighs 62.4 pounds.  If you multiply 452 cubic feet from above by 62.4 pounds you get roughly 28,267 pounds of snow (water).  Yes that is over 14 tons of snow that I shoveled!  I just patted myself on the back and said "Good Job David".


HAVE YOUR STUDENTS CALCULATE THE WEIGHT OF THEIR OWN DRIVEWAY.
They will need to use this info.
1.  Find the area that you shovel on your driveway.   Free Map Tools 
2.  Use 15 inches of snow equals 1 inch of water ratio.
3.  Use 62.4 pounds per cubic foot of water.

The beautiful part of this problem is that their are a lot of ways to come up with the answer.  Wallberg (the author of the article) found the weight of 1 square foot of water by 1 inch high.  He used this to get the the weight of 1 square foot of water for whole seasons worth of snow (water).  I love this problem because it gives the students some ownership of the work.  Give it a try.  I certainly will.

Thanks to mwalberg@tribune.com Twitter: @mattwalberg1  for writing this cool article.


Thursday, February 27, 2014

ICE Conference 2014

I attended the ICE Conference (Illinois Computing Educators Conference) today.  Here are some of the things I am going to use.


1. Keynote Speaker: Mike Muir from Maine  twitter @mmuir
http://multiplepathways.wordpress.com/author/multiplepathways/
"It's about the learning not the stuff"
"We should have a Pedagogical Focus not a Tech Focus"
"It's not a Formative Assessment it is Formative Feedback"
"Create great learning with Technology"

2. Using Digital Tools as Assessments for learning:  Jamie Gourley and Josh Zwart @Josh_Zwart
Hand Out
Quizlet is an easy program that can work for math.  Check out Josh's trinomial example example: http://quizlet.com/34025898/scatter
I also learned that you can put in videos to Google Forms.


3.  Cool Tools for the BYOD Classroom:  Tammy Worcester www.tammyworcester.com  @tammyworcester Evernote tip sheet
This is a feedback system that you can draw pictures and submit them to the instructor.
http://www.infuselearning.com/  I tried it and it is really cool.
She shortened urls and made a QR code with a Google Document.  http://tammyworcester.com/urlshortener/
She made a Google Form and had us enter our name and the place we were born.  She then took the data and put it in a site called  www.batchgeo.com  Instructions are here:  http://tammyworcester.com/batchgeo/
She did a different presentation with Greg Tang and I thought you would like to see some of that info:  Evernote Handout


4.  I saw Nancy Norem Powell  @NAPmath doing a session on SMARTBoard Wigits  http://napmath.wordpress.com/  and http://smartboardsmarty.wikispaces.com/
I learned about how there is a beta version of Extreme Collaboration which was taking information from any device (not a clicker) and using the info on the SMARTBoard.  Click here on how to get it


5.  I met Tony Schlorff who told me about the SMART LightRaise™ interactive projectors which does not need the board.  It shines on the wall and you can draw using your finger.  AMAZING.  He said it costs about a third less than the regular SMARTBoard.


6.  Lastly, I went to a workshop with Our Journey in “Going Google…”  Matt Dusterhoft, Pat Deane & Kate Fahey  Lockport Township District 205  Click here for their handout  twitter:  Kate:@EdTechKate Pat: @ITDeane  Matt:@mduster

Tuesday, February 25, 2014

The Desmos Obstacle Challenge

Here is the challenge:  To move from the START POINT to the END POINT using equations.  You will have to navigate a little bit through some obstacles.  You can have your students use any equation or certain equations.  For instance, you could have them use all parabolas or all lines.  I have put together a few challenges.  They are below.  You can go to any of them simply by clicking on the image.  If you want to make your own, then just go to www.desmos.com and click on the "+" sign (add item) and add a picture of your own.

Click on any graph to go to the DESMOS graph and take the Challenge.  


Desmos has a FACE drawing website that all math teachers need to check out calling it DESMAN.


Friday, February 21, 2014

Making a Face with DESMOS.com

If you haven't worked with desmos yet, you are missing out.  It is so easy and intuitive.  The students will catch on so easily.  Here is the in class assignment I gave today.  This was a precalculus class.  You can easily adjust this for any high school math class.

This was a student's work was done in 15 minutes of class time.  There is so much math here too.  
  

Sign up with desmos.com and make a face using the free online calculator.

Your face must include these things:
1.  A circle or ellipse
2.  A line
3.  A sin or cos wave
4.  A slider
5.  A parabola
Now post your face in a link to this website:  http://tinyurl.com/nchsprecalculus6

Please go to this site to see all the wonderful examples that my students made.  They will make you smile.

Here are some questions that I had today.
How do you make the sin wave go vertical instead of sideways?
How do you move the circle from the center?
How do you restrict the x values so they don't always show?
How do you make a circle bigger?
How do I make this parabola wider?

Take 15 minutes and make a face today and you will see how much math DESMOS has.  Now this was a fun class.  The students were really active in their pursuit of the math topics. Please try this and let me know how it goes.
Dave


Thursday, February 6, 2014

8 Ways to Incorporate Empathy into Your Teaching


I read a blog post by Matt Renwick on how Empathy is the Most Critical Skill for Educators to be Highly Effective in Teaching Children.  I thought it was an excellent post.  It helped me to really think about the question of how we can really know what our students are going through.  The post also has really made me think about empathy as a skill that can be practiced and increased.   It also made me think about how I need to be diligent and work at the "Empathy Skills".  I need to take time out from my regular routine and put myself in the students world.  So I made this small list of items that I need to continue working on to help my EMPATHY SKILLS.  


1.  Shadow a Student for a Day 
This is the ultimate empathy skill builder.  This actually puts you in your students shoes for a day.  I did it last year and it was a fabulous experience that I believe I need to repeat yearly.  I changed my perspective on homework, in class movement, lecture, school furniture and more.  If you get a chance, this will change the way you look at your students.  I want to do this again this year.  Summary of my day shadowing a student in a blog post

2.  Questionnaire (Try Google Forms)
Google Forms are so easy to use. The feedback is immediate and flexible.  Overview of Google Forms  It can be anonymous or not.  Ask your students to give you honest feedback on somethings in your class like... How much time they are spending on homework.  Or you could ask about their engagement level in class.  This will give some direct feedback for where your students are in your class.  I have done this recently and it changes your perspective.  It  I make a google form and then change the name using tinyurl.com  to give it to my students See an easy video on using tinyurl with your students  See the google form questionnaire that I gave recently.

3.  Listen to the Goals Your Students Have
Give your students a chance to tell you their goals for your course.  Discuss things like homework completion, preparation for tests, class participation, and what they do when they are at an impasse with homework.     Click here to see the blog post on this    Feel free to modify this goals worksheet for your own use.

4.   Do the Homework
This seems too obvious. Take the time and do the homework as you ask them to do the homework.  With all the work shown.  This is an activity that will really help us experience what our students are experiencing.   I know that we can't always do this because it would take too much time.  Give it a try every so often.

5. Think About (Pray for ) EACH Student
This one sounds easy, but is actually difficult.  Go through your class roster, one by one, and think about each student.  Think about them as a person outside your class.  Think of them as a student inside your class. Think of their strengths and weaknesses.

6.  Call Home Early
Parents/Guardians insight is invaluable.  A quick call home early in the year or semester helps us and parents open the communication pipeline.  Also, the question "Could you give me a couple of ideas of how your child best learns?"  or  "What makes your child tick?"   or  " What are some strengths and weaknesses that your child has?"  A call home before your student actually needs a call home is the best.

7.  Look at the Records
Look at IEPs, 504s, Nurses reports, standardized tests, etc.   This seems obvious but it is our job.

8.  Find Activities that your Students are Involved In
Sports, Drama, Video Games, Church, Clubs, Collections, Music, Hobbies, etc... Go to a school activity that involves some of your students.  You will immediately get a different perspective of your student.  It is the same thing as when a student sees you in the grocery store and is so amazed that you have a life outside of school.  Anyway, it is a lot of fun to see students in their element.

Maybe you have some ideas as well?  Please share in the comments.
Best,
Dave


Monday, January 27, 2014

Google Drive! What are you waiting for Math Teachers?

Here it is.  You need to post EVERYTHING (except tests/quizzes) in Google Drive.  Homework.  Review Tests.  Class notes.  Class worksheets.  Goals.  Calendars.  Answer Keys.  It is so easy and your students will use the things you post.  Your students will use it on the bus, waiting at the doctor, while watching tv, and as a passenger in a car.  Make your class convenient for them.  They will reward you with accessing them often.  One of the best things about this system is that your students can never say that they lost something that you handed out.  Please see my folder that I use for my Precalculus Students:  Precalculus Student Folder  An added benefit of Google Drive is that when the students are viewing the documents, they have a preview of each document.  This is very convenient.   By the way, your students can't change anything in the folder.  They can only view it and download it.   Here is a short video on how to do this.  Or you could take the steps below.


How do you do this?
1.  Sign up for Google account.  https://accounts.google.com/SignUp  If you have a gmail account, then you already have a google account.
2.  Go to Google Drive.  https://drive.google.com
3.   Make a folder for your class.  For example Precalculus Student Folder  Do this by clicking the RED CREATE button and then click Folder naming it as you wish.
4.  Make sure this folder is public.  Right click on the folder itself and then click share.  Or check mark the folder, and then click on More at the top drop down box and click SHARE.   Change the access to PUBLIC.  At the same time grab the link for the folder.  
5.  Use the link on a blog or web-page that you own.  Just paste it to a location that the students can easily get to.  I like to make it smaller at www.tinyurl.com  This is an easy site that you can shorten long urls to be your own unique name.  Of course it will have tinyurl.com at the beginning.  I have renamed a url calendar at www.tinyurl.com/mrlsladkeypc.
6.  Download Google Drive onto your laptop.  This will enable you to store files directly to your folder on your laptop and thus straight to your students. https://support.google.com/drive/answer/2375078?hl=en
7.  Now, you can start putting things into this folder.  Remember that anything you put into this folder can be seen by your students.  You can actually put word files, pictures, powerpoints, movie clips and pdfs.    I would start by creating unit folders within this master folder.  Things like Chapter 1 Functions.  They will all have public permissions because your master folder is already public.  Here is the best thing of all.  Whenever you make a worksheet, simply drop a copy into your Student Folder on your Google Drive and your students will be able to access it.  Give it a try and let me know how it turns out.
Best,
Dave

Monday, January 20, 2014

Geogebra: The Unit Circle and the Reference Angle.

A couple of colleagues of mine have been showing me things in Geogebra.  I tried it this week with a unit circle problem.  It turned out great.  I had each student/pair with a computer in front of them.  We went over the Unit Circle and the students used the laptop or iPad to maneuver around the GeogebraTube post that I had made.  My colleague called this COMPANION Technology.  (They used it with their learning) Many of the students started out using the digital Unit Circle and manipulating it.  However, as time went on, many stopped using the digital technology and just did the work in their head or on paper. There was a homework assignment that involved the digital Unit Circle that I had made in Geogebra.  About half of the students ended up needing it.  The next day the unit circle questions and discussions were amazing.  They really had a conceptual grasp of it.
Here is the link to the http://geogebratube.com/student/m69795  to see the unit circle geogebra worksheet.  Please note the questions at the bottom of the page.

Steps I took to get this up and running.
1.  Download Geogebra to your desktop.  http://www.geogebra.org/cms/en/download/
2.  Make an interactive Geogebra File.  (see intro to geogebra youtube:  http://www.youtube.com/watch?v=OwNru3Znsfk  I used this video to help me:  http://www.youtube.com/watch?v=GG0F49XBJO0
3.  Save the file to a place where you can remember to retrieve it.
4.  Go to Geogebratube.org  http://geogebratube.org/  You will need to login.
5.  Upload your file to Geogebratube and fill in all needed information.
6.  Get the link of your upload and distribute it to your students.

I hope you can give Geogebra a try,
Dave